Magento 2 Integration
Announcement
Purpose#
This is the official documentation for the Magento 2 Latitude Payment Extension. This module is tested and compatible with Magento 2.3.5 onwards and up to Magento 2.4.5 Enterprise edition and Community edition. Once installed, your Magento 2 site will have the ability to process LatitudePay, Genoapay, Latitude Interest Free & GEM transactions.
This page will cover integration with LatitudePay and Genoapay only.
The integration guide for Latitude and GEM Interest Free can be accessed here
Supported Countries#
Australia and New Zealand
Supported Products#
Australia#
LatitudePay, LatitudePay+, and Latitude Interest Free
New Zealand#
Genoapay and GEM Interest Free
For New Zealand merchants (with NZD as default currency), please refer to Genoapay/GEM Interest Free guide instead of LatitudePay/LatitudePay+/Latitude Interest Free guide for every step described on this page.
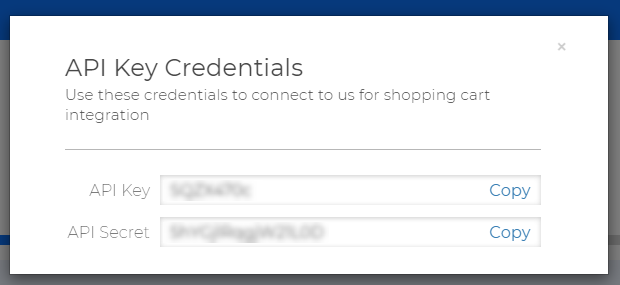
LatitudePay/Genoapay API Credentials#
To integrate with LatitudePay/Genoapay, you will need to obtain the following API Credentials:
- API Key
- API Secret
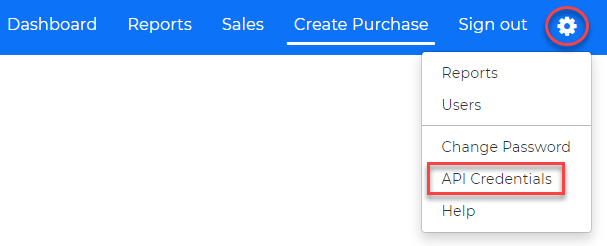
These Credentials are found on the settings dropdown on your Merchant Portal:
- LatitudePay Portal - https://app.latitudepay.com/merchant/login
- Genoapay Portal - https://app.genoapay.com/merchant/login
If you have any issues locating these, please contact us at integrationsupport@latitudefinancial.com
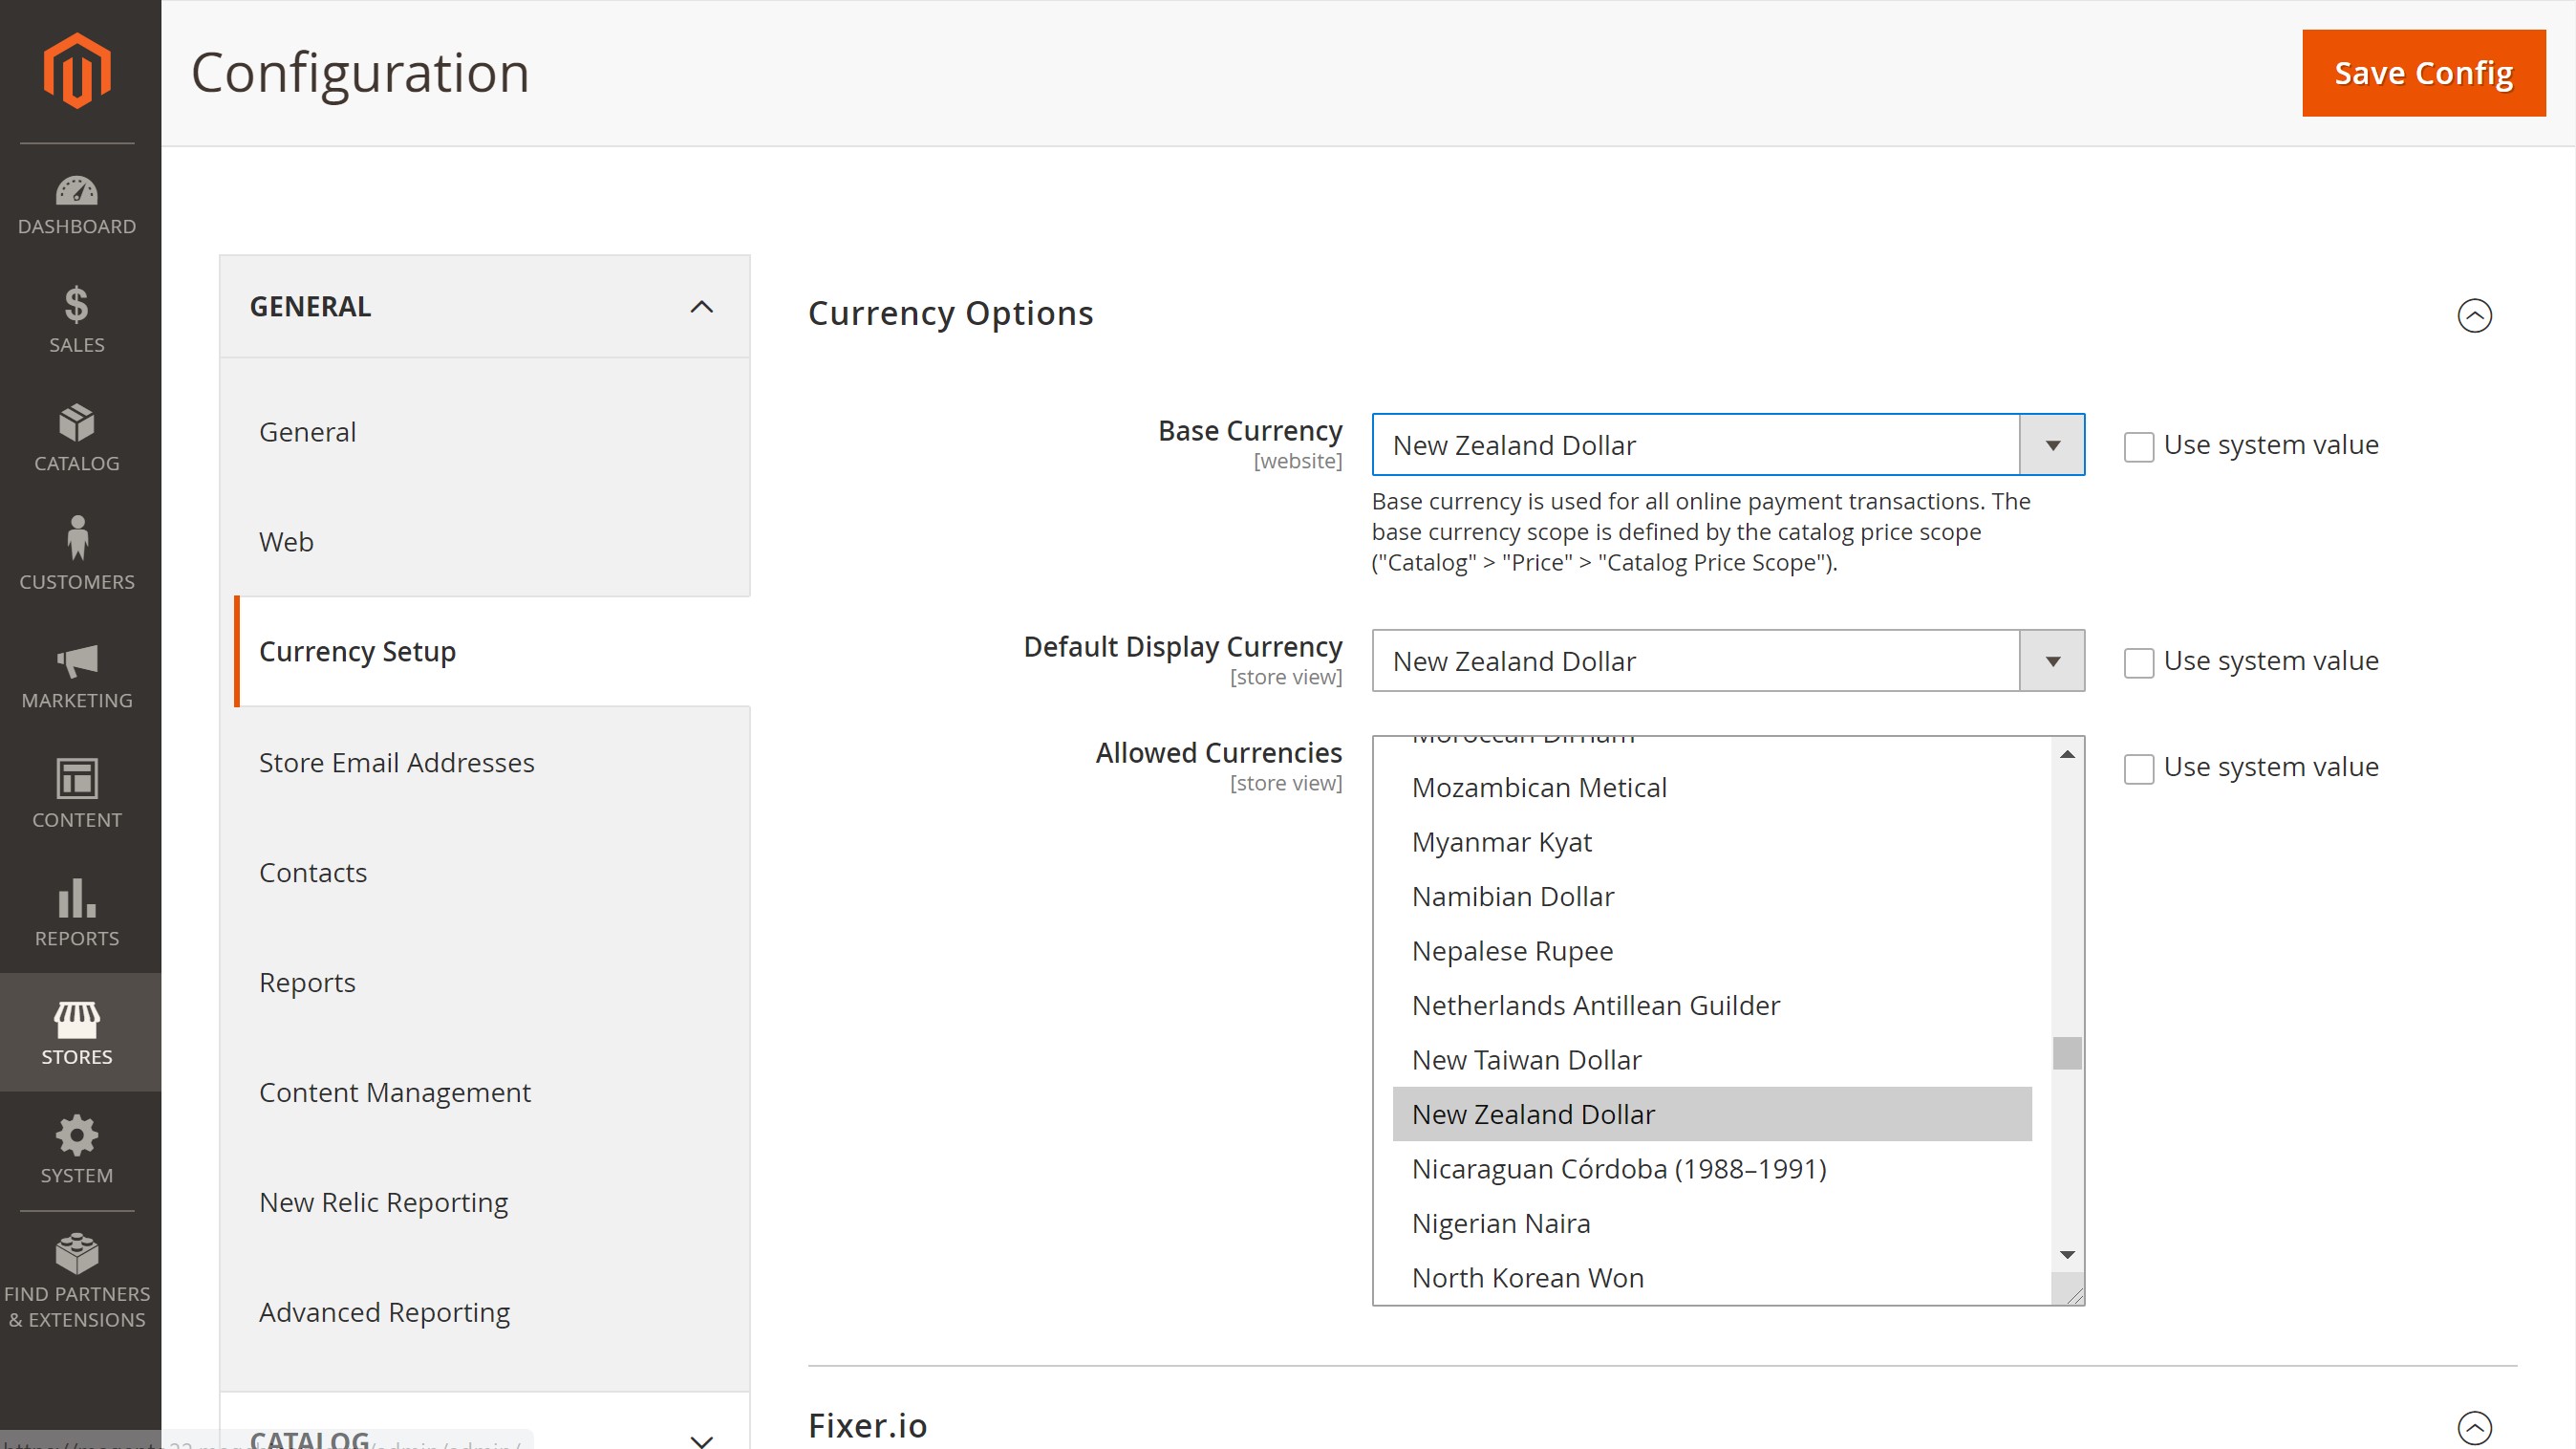
To enable LatitudePay payments, please ensure that you have the correct Currency configuration setup in the site. Define the currencies and update the Currency rates accordingly.
Multiple Currencies#
If multiple Currencies are used in the site:
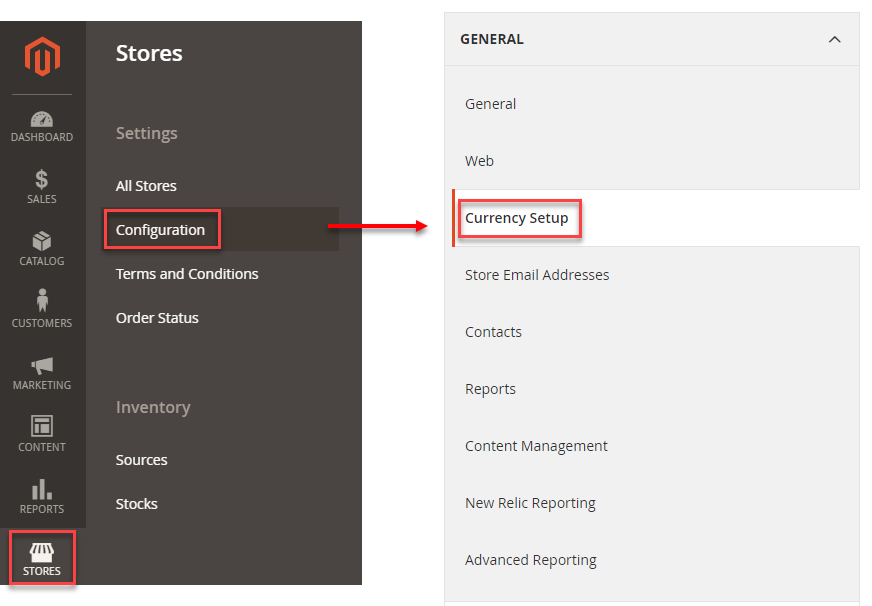
- Proceed to Stores > Configuration > General Menu > Currency Set Up
For all LatitudePay/Latitude Interest Free transactions, please ensure you select Australian Dollar (AUD) as the Base currency, Default Display Currency and Allowed Currency.
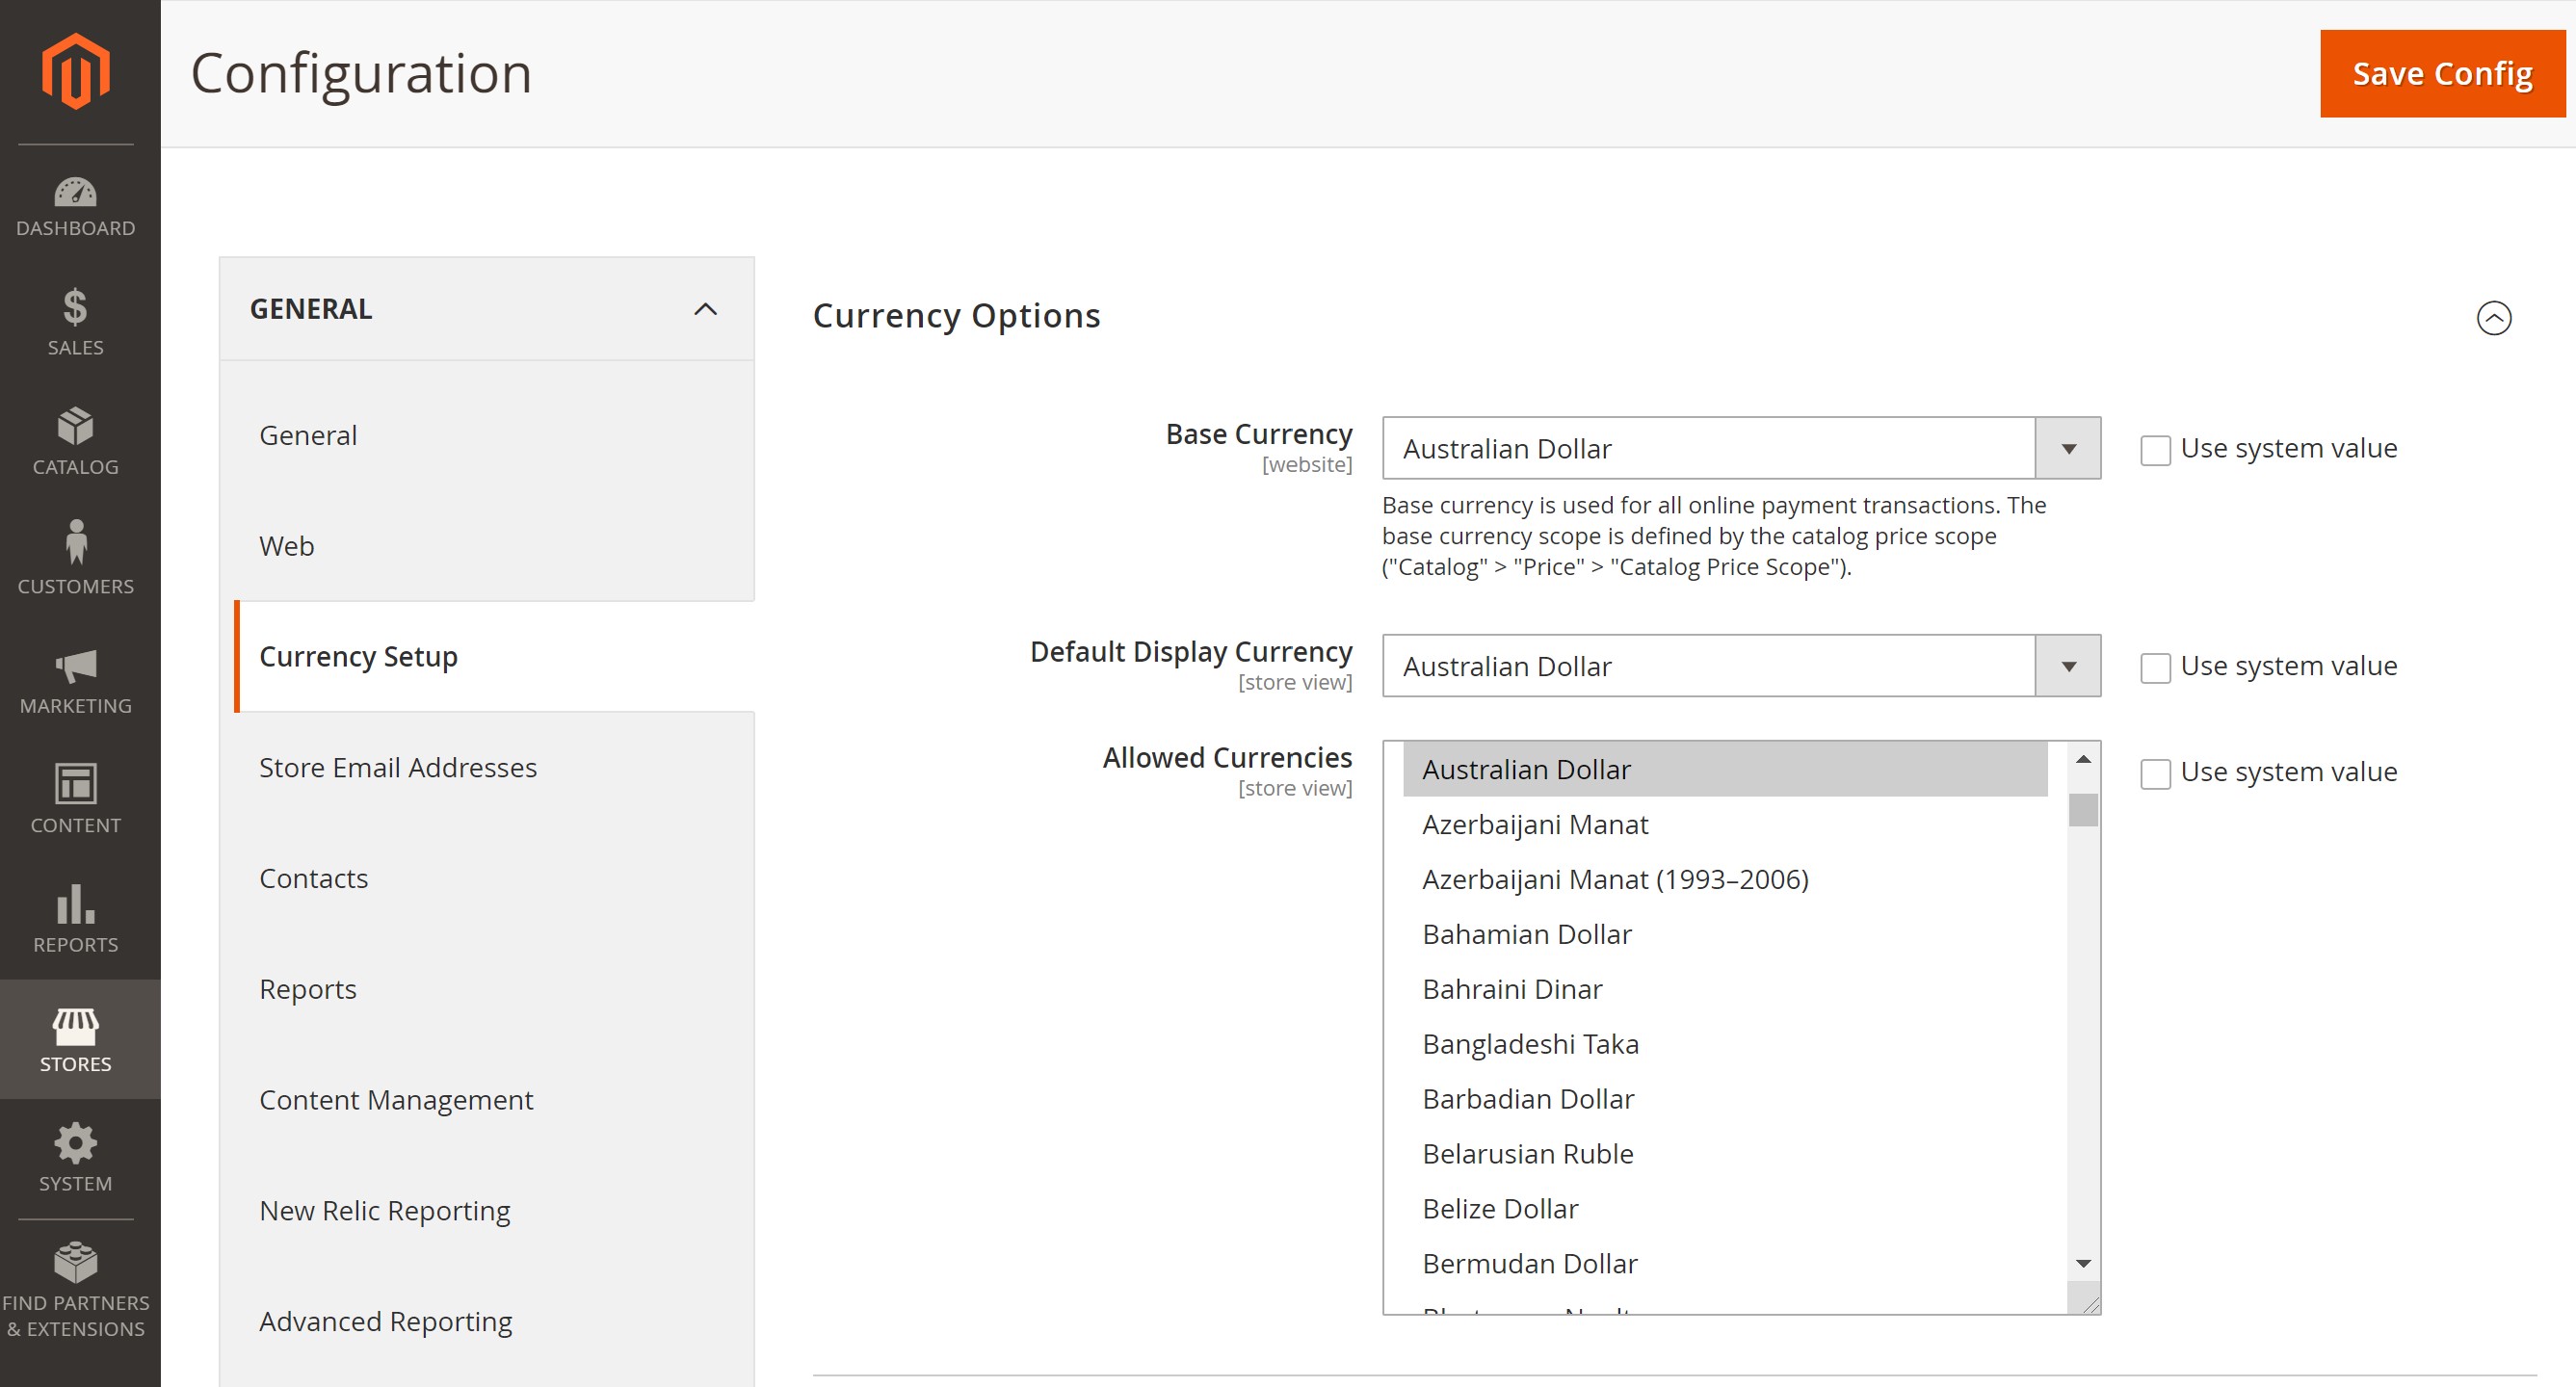
For all Genoapay/GEM Interest Free transactions, please ensure you select New Zealand Dollar (NZD) as the Base currency, Default Display Currency and Allowed Currency.
Installation Process#
Option 1: Composer/Marketplace (Recommended)#
Composer installation tested on Magento 2.4.x, if you have problem using this installation for older Magento 2 versions, please refer to the Manual Installation.
Our Magento2 extension is an Adobe-approved extension and is available on Magento 2 Marketplace.
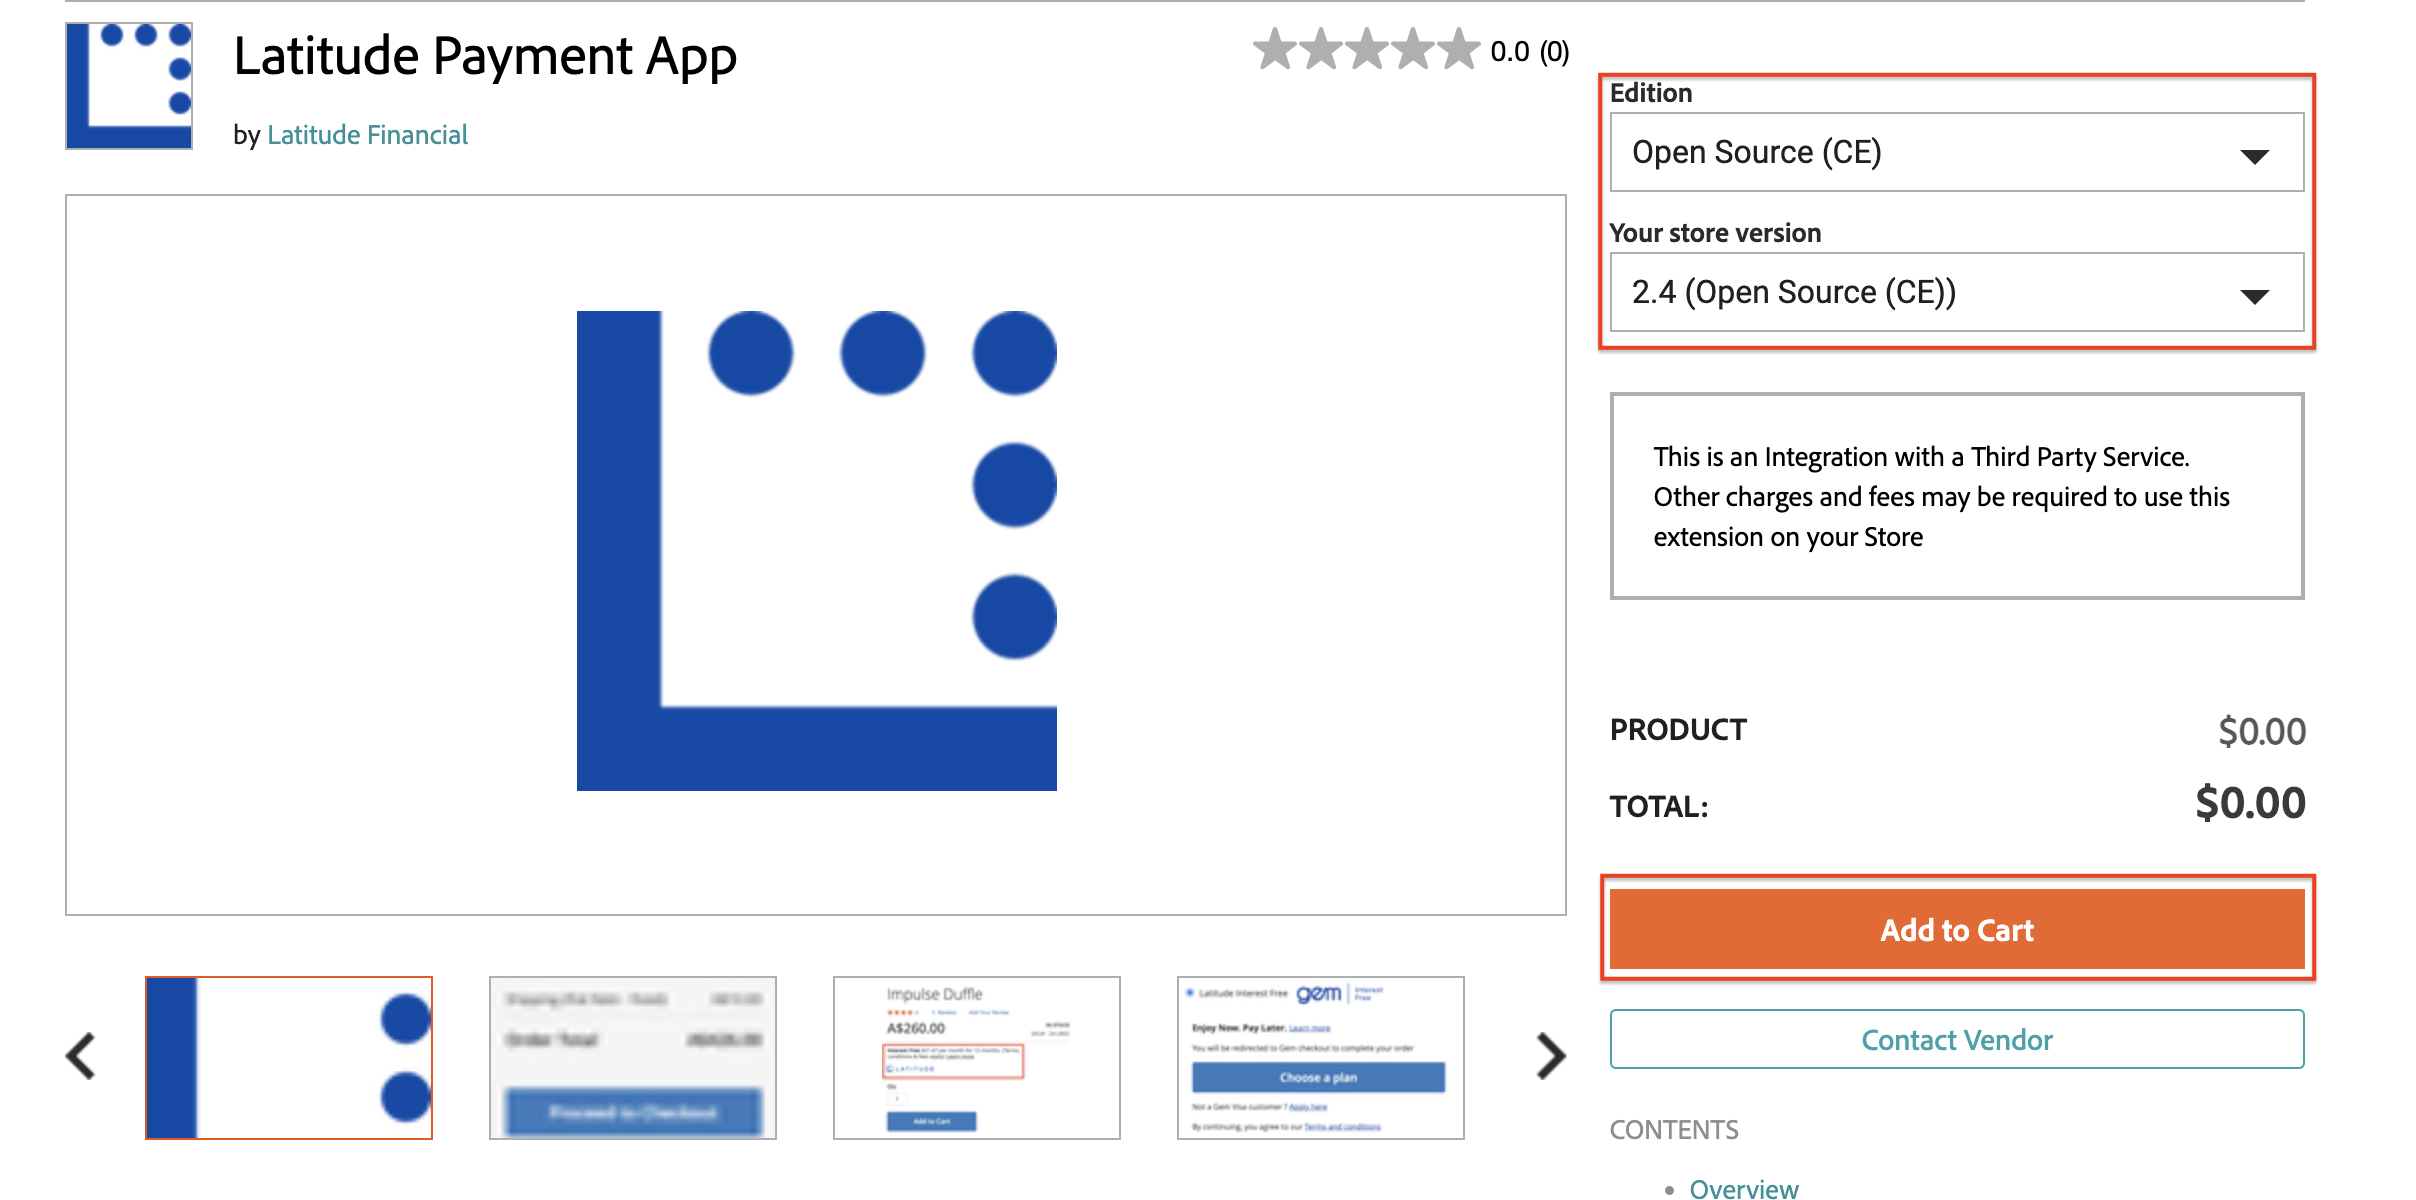
There you can get more details on our extension (extension specifications, contact details, etc.) and follow the marketplace installation experience.
Alternatively, simply follow our composer installation guide below to install and activate our extension properly:
- Open terminal and navigate to Magento 2 root directory, for example:
- Run:
- Configure the module on Magento 2 Admin Panel.
Option 2: Manual#
Download the zip file from the latest release on GitHub
Open terminal and navigate to Magento 2 root directory, for example:
- Copy the content of the unzipped folder and paste it into
app/code/LatitudeNew/Paymentfolder in the Magento 2 root directory:
- Run:
- Configure the module on Magento 2 Admin Panel.
How to Upgrade Module#
Every time we release a new version of the plugin, you can follow this guide to update your existing module. Please watch our repository to get notified every time we have a new update.
If you are migrating from v1.x.x to v2.x.x of LatitudePay/Genoapay plugin, please follow this guide upon finishing v2.x.x installation.
If you are migrating from v2.x.x to v3.x.x of our plugin, please follow installation guide and not the update process, since the package names between v2.x.x and v3.x.x are different on composer
Composer Update#
If you installed the module via Composer:
- Open terminal and navigate to Magento 2 root directory, for example:
- Run:
Manual Update#
If you installed the module manually:
Follow the same manual installation instructions above and replace the content of
app/code/LatitudeNew/Paymentcompletely.Run:
Breaking Change in v2.0.7#
As of version 2.0.7 of the plugin, we are abandoning the custom order status used in 2.0.6. pending_approval status is now deprecated and has been replaced by pending_latitude_approval.
This means if you are upgrading from lower vesions of 2.x.x to v2.0.7, you need to uninstall the older version first and install 2.0.7 fresh to avoid our custom status not being added properly to the status order table.
What's New in v2.x.x#
If you are upgrading from v1.x.x to v2.x.x, here are the new features that you need to be aware of:
- A new order will always be created in the backend as soon as customer clicks Place Order with LatitudePay/Genoapay on your checkout page
- The newly created order will have the default status: Pending Latitude Approval
- The Pending Latitude Approval status will be updated to Processing when customer has successfully completed the payment on our gateway
- In case of failed payment, the order status will be updated to Canceled
- In case of abandoned payment gateway, the order status will stay on Pending Latitude Approval for 24 hours. After 24 hours has passed, our plugin's clean up Cron will automatically change the order's status to Canceled
What's New in v3.x.x#
The only difference between our v2.x.x to v3.x.x is having the ability to integrate with Latitude and GEM Interest Free. With this version, you can configure 3 types of payment gateways by just installing 1 extension.
The orders workflow for LatitudePay/Genoapay will be the same as in v2.x.x.
Migrating From v1.x.x to v2.x.x#
If you have previously been using the older version of our plugin on your site and is currently migrating to the version 2.x.x or above releases, please do the following in order to ensure smooth transition.
Step 1 Remove Old Plugin (v1.x.x)#
- Open terminal and navigate to Magento 2 root directory, for example:
- Remove Latitude folder in
<Magento 2 root>/app/code/directory.
Step 2 Remove Old Values From Database#
Check the core_config_data table in your database for any variables related to the old LatitudePay/Genoapay plugin and REMOVE any keys that has this format:
Step 3 Install and Configure New Plugin (v2.x.x or above)#
- Follow the manual installation guide or the composer installation guide (Recommended)
- If you haven't done so already in step 1, run the following from your Magento 2 root directory (
/var/www/html) for these actions to take effect:
- Follow the configuration guide to setup LatitudePay/Genoapay plugin
Step 4 Double Check#
Sometimes upon upgrading from version 1.x.x, you might find that the redirection link back from LatitudePay/Genoapay gateway is broken (i.e. getting page not found error on your site). This is due to the fact that v1.x.x has an entirely different codebase compared to the v2.x.x and above.
To ensure this issue doesn't happen, please check in your Database's core_config_data table again (after installing our new plugin and doing the configuration) for these variables, it should now show these values:
You can also confirm if the changes take place by executing this command from your Magento 2 root directory (/var/www/html)
The new values should be reflected here
Last step is to try to checkout using one of the available payment gaetways (OR simply click return to cart from the payment gateway), it should redirect back to the proper pages from our gateway (not showing blank page or page not found error). After that, you might also want to check if your order record is showing the expected result from the transaction you just made.
Configuration#
Payment Method
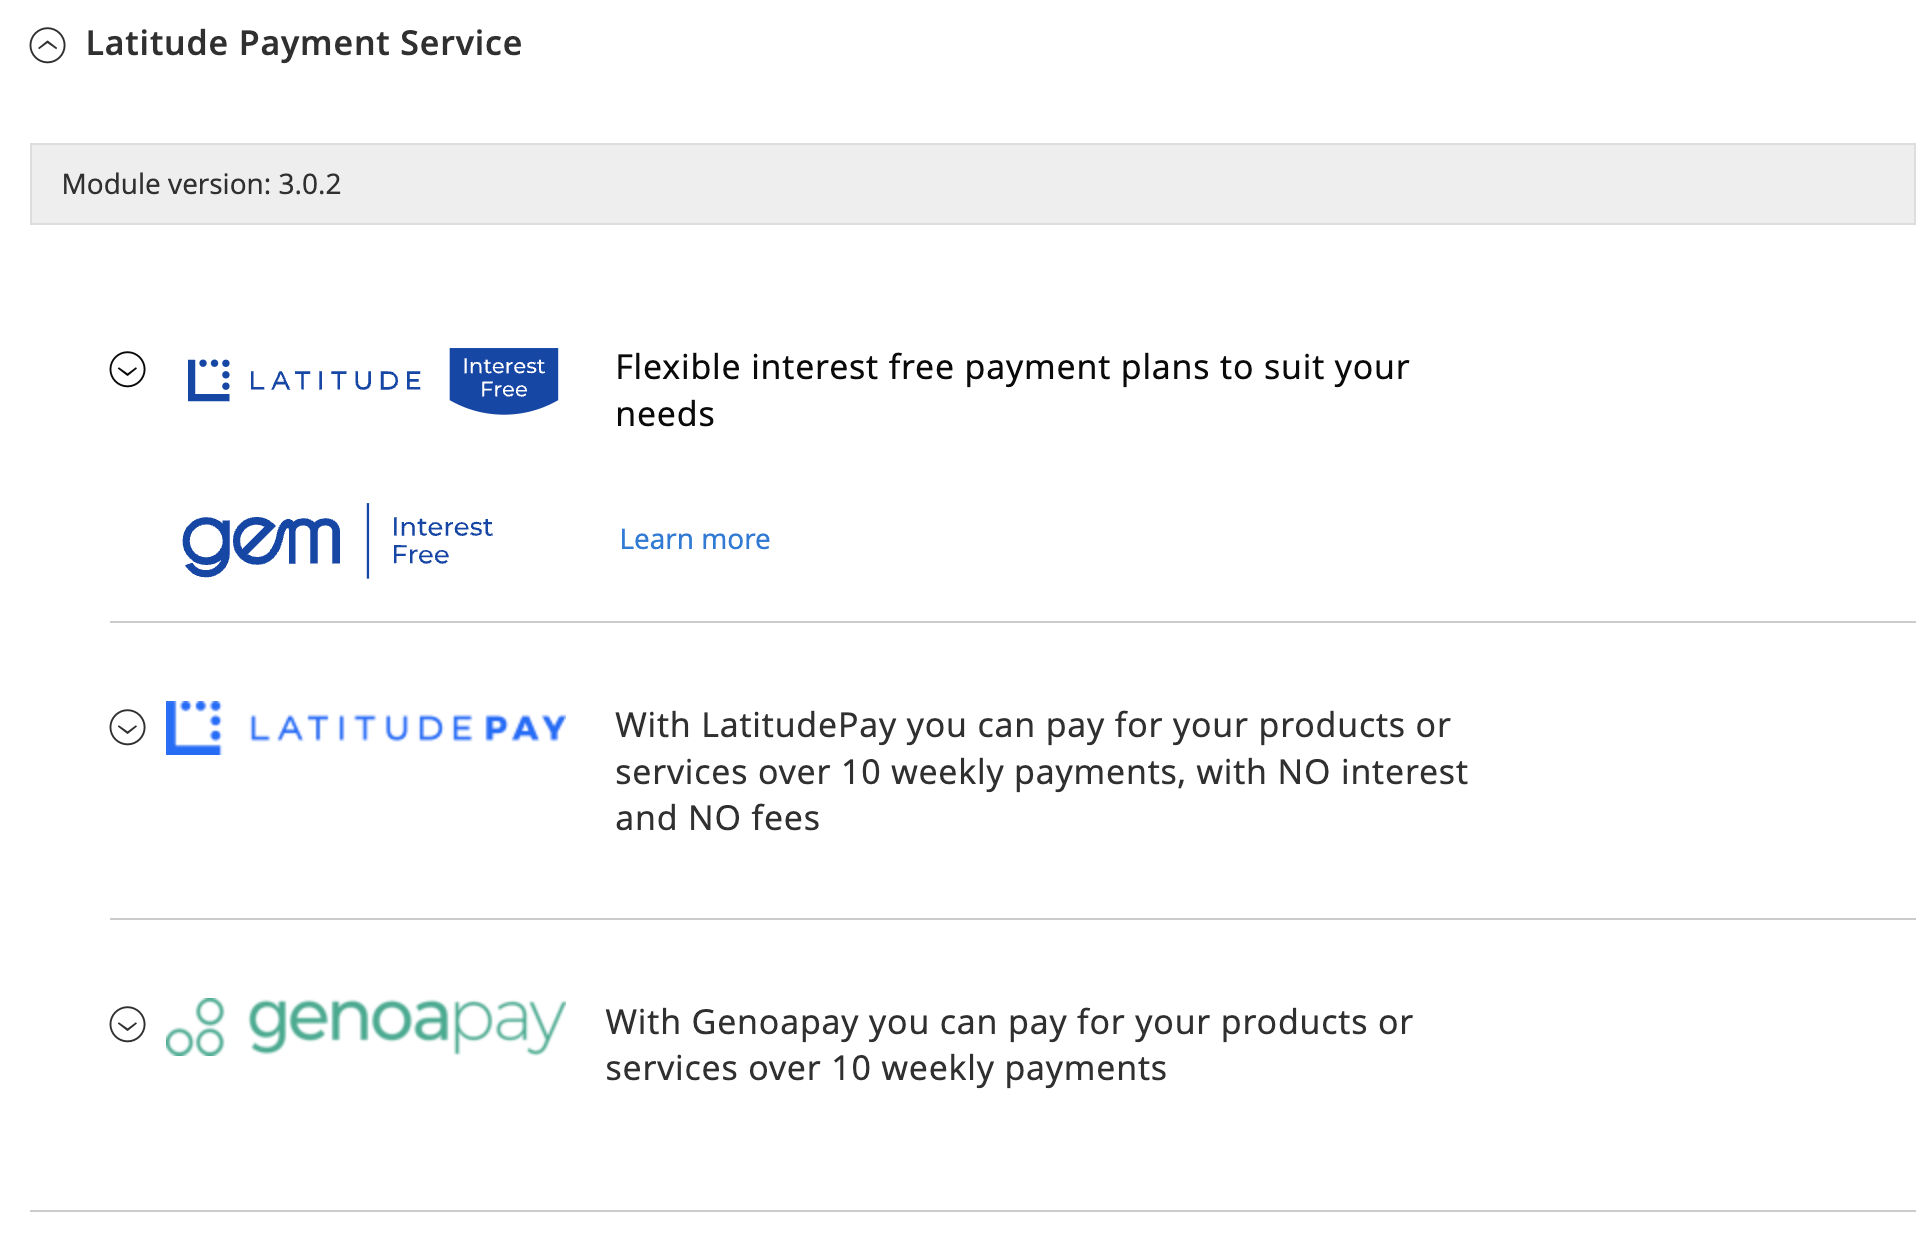
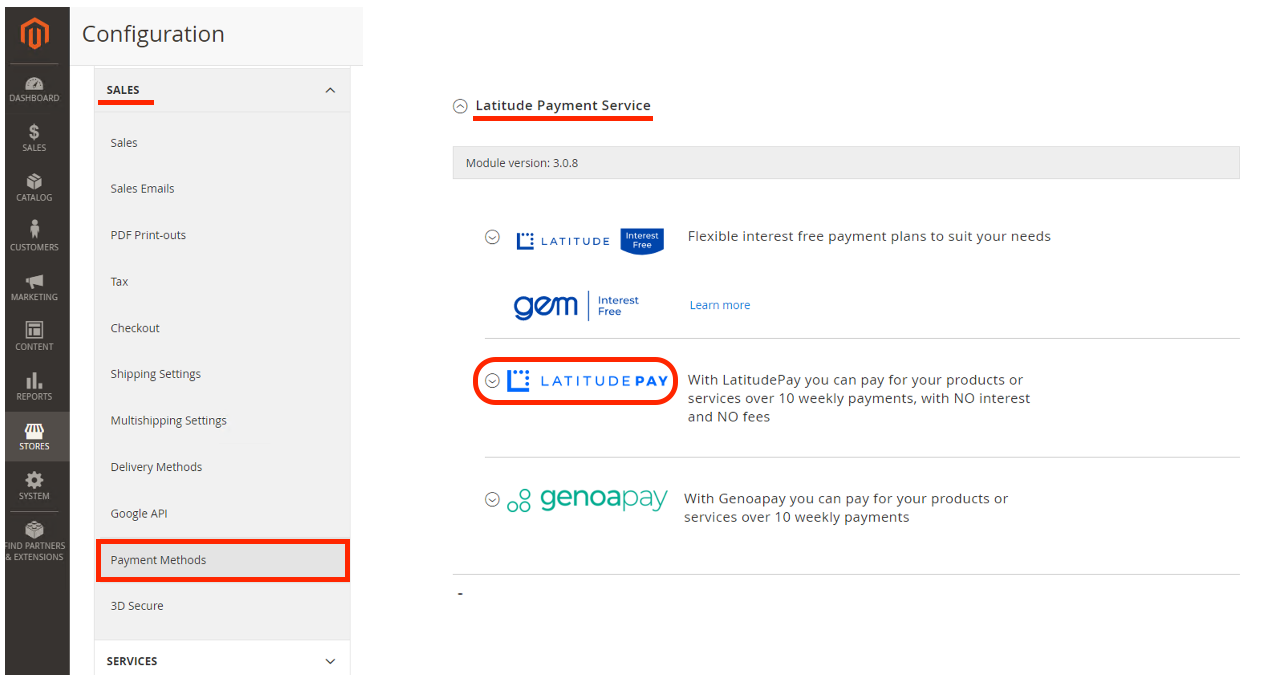
- Login inside the Admin Panel and proceed to Stores > Configuration > Sales > Payment Methods
- There you will find LatitudePay, Genoapay, Latitude Interest Free and GEM Interest Free payment configurations under OTHER PAYMENT METHODS -> Latitude Payment Service subsection:
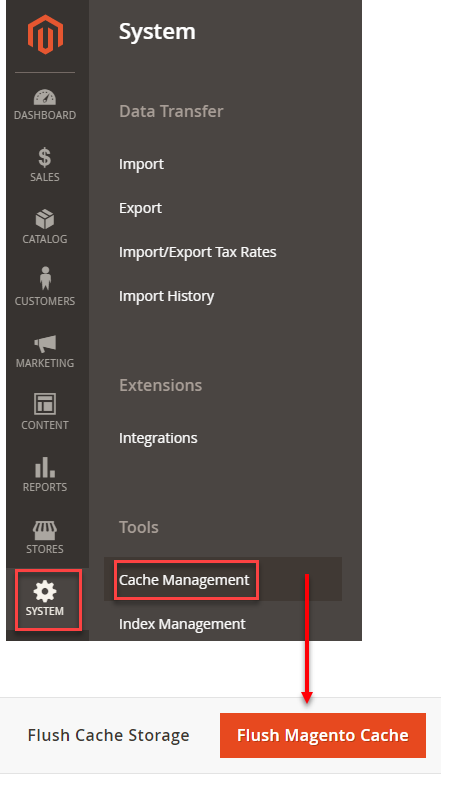
- If the Payment Module Panel is not visible in the list of available Payment Methods, proceed to System > Cache Management and clear Magento Cache by clicking on Flush Magento Cache
- Proceed back to Stores > Configuration > Sales > Payment Methods and under the payment method click on one of the payment methods to expand the available settings
LatitudePay/Genoapay Config#
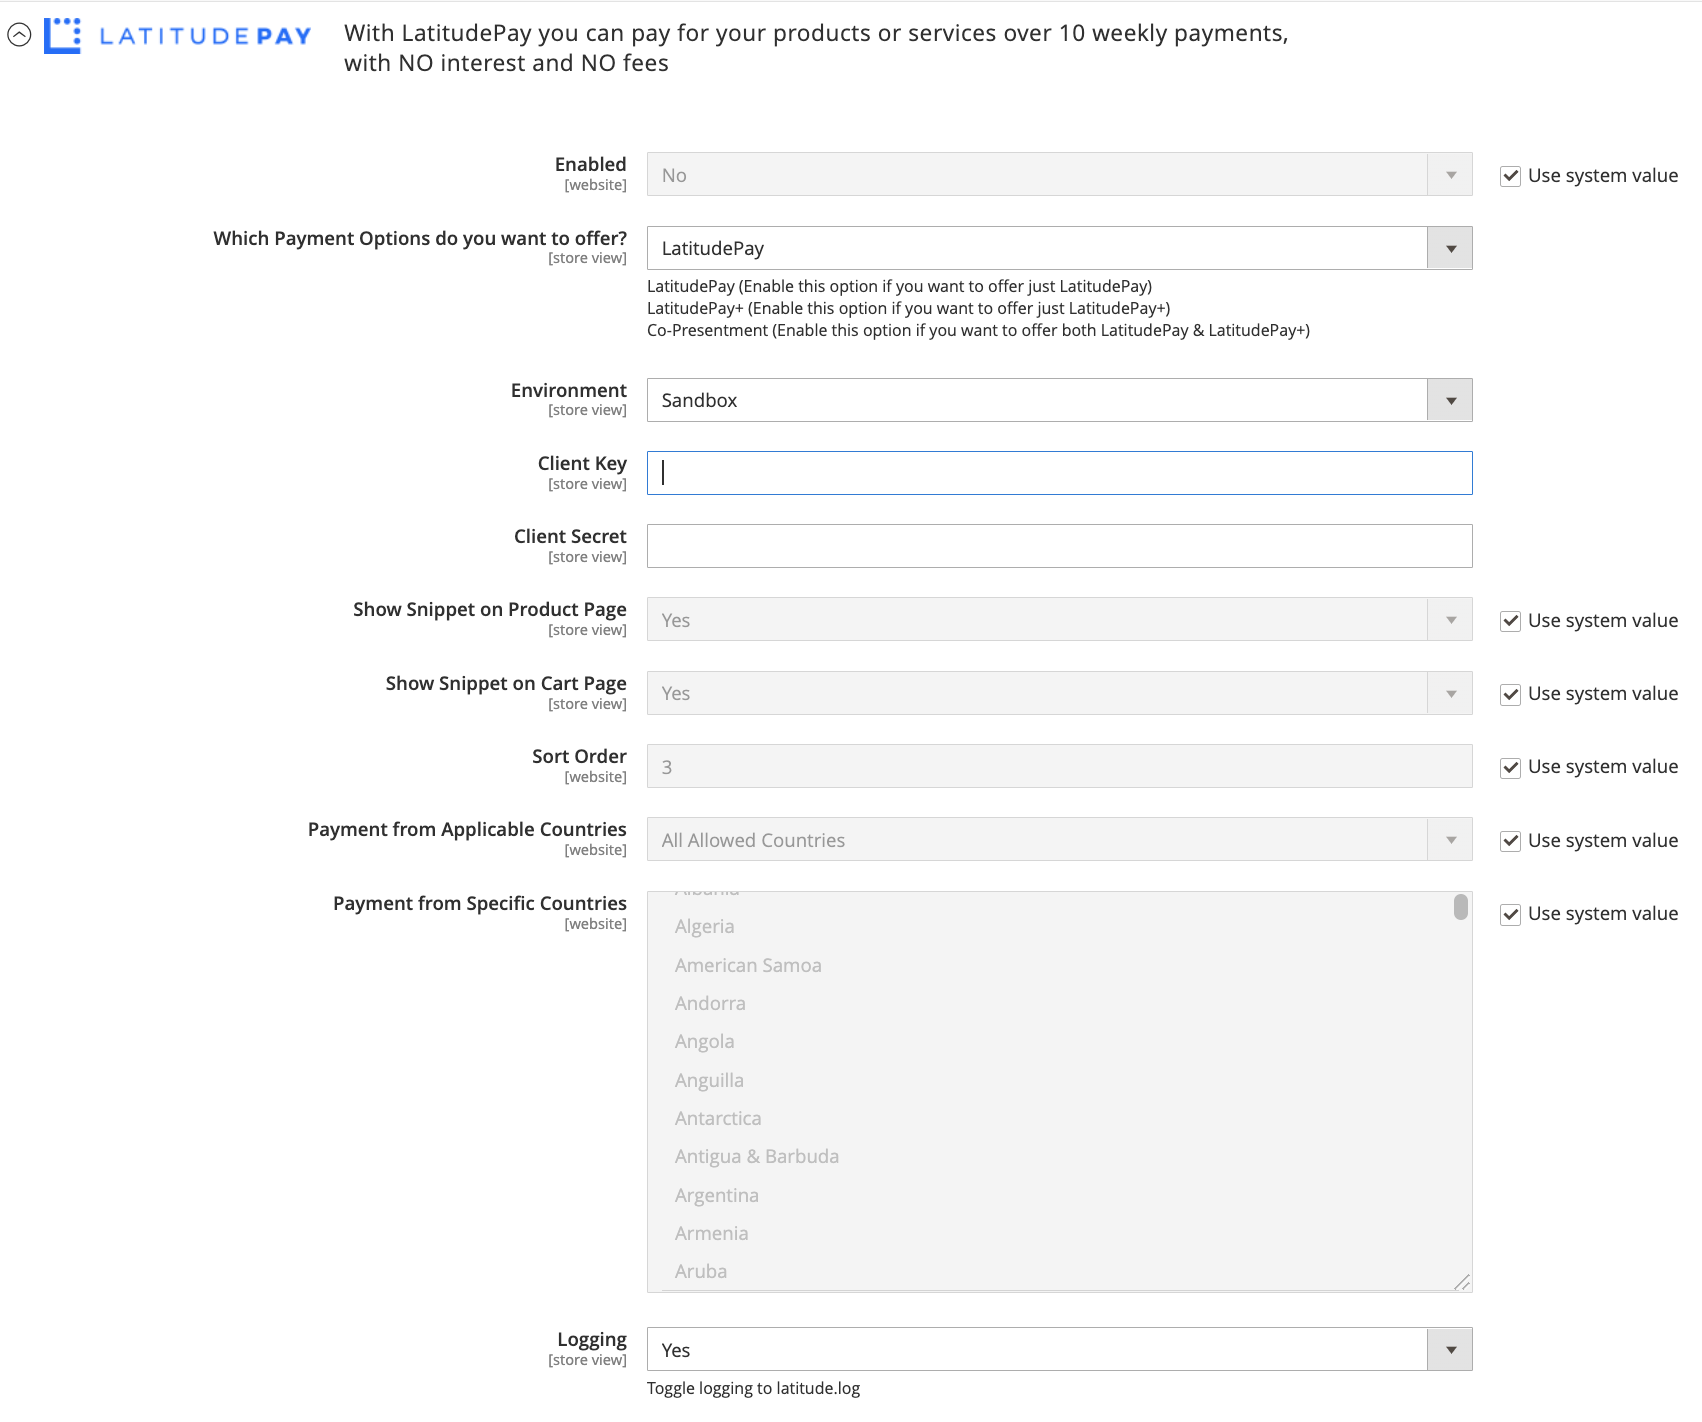
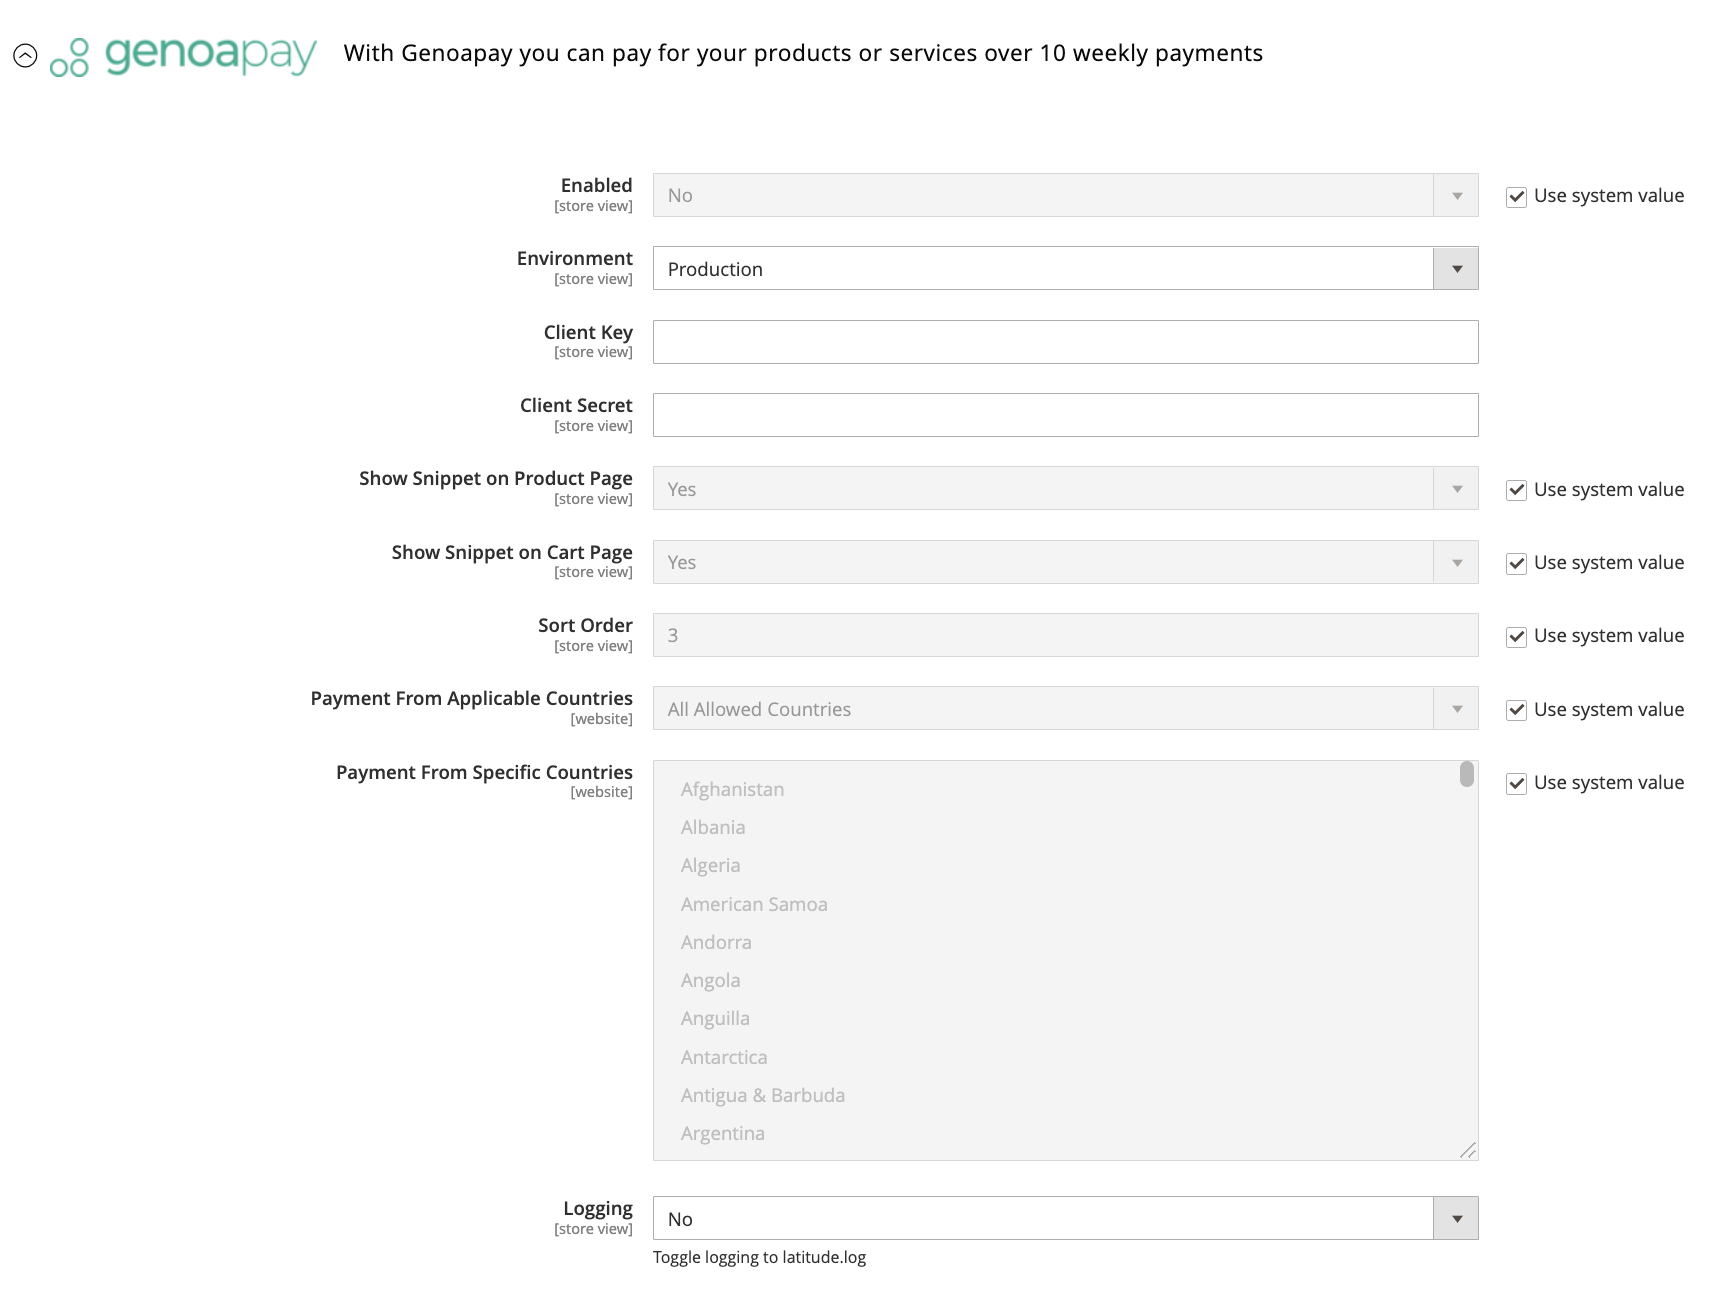
The following options are available for you to customize:
| Field | Default | Description |
|---|---|---|
| Enabled | Yes | Set Yes to enable the payment |
| Environment | Production | Select Sandbox to test the plugin using Sandbox Credentials |
| Client Key | Obtained from LatitudePay GP merchant portal. Please refer to this guide to locate your Client Key | |
| Client Secret | Obtained from LatitudePay GP merchant portal. Please refer to this guide to locate your Client Secret | |
| Show Snippet on Product Page | Yes | Set Yes to display LatitudePay/Genoapay snippet on Product Page |
| Show Snippet on Cart Page | Yes | Set Yes to display LatitudePay/Genoapay snippet on Cart Page |
| Sort Order | 3 | Display order on Checkout Page |
| Payment from Applicable Countries | All Allowed Countries | All Allowed Countries - available to Customers from anywhere Specific Countries - available to customers from selected countries listed in "Payment from Specific Countries" option |
| Payment from Specific Countries | Australia & New Zealand | "Payment from Applicable Countries" option must be "Specific Countries" for this option to take effect |
| Logging | No | Set Yes to log activities involving this payment |
LatitudePay Snippet on Product and Cart Page#
- Inside the Admin Panel, proceed to Stores > Configuration > Sales > Payment Methods > Latitude Payment Service > LatitudePay and select Yes on the Show Snippet on Product Page option to show this on your site's Product Page
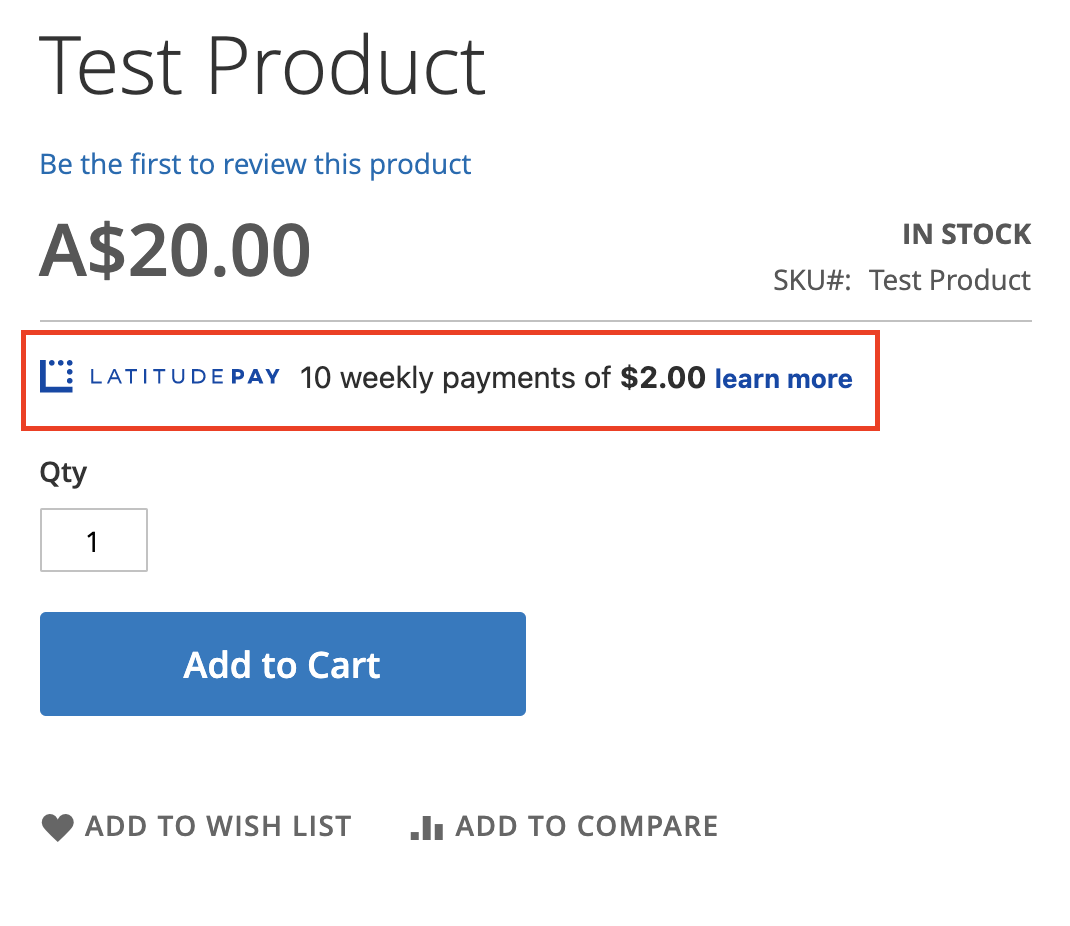
- Inside the Admin Panel, proceed to Stores > Configuration > Sales > Payment Methods > Latitude Payment Service > LatitudePay and select Yes on the Show Snippet on Cart Page option to show this on your site's Cart Page
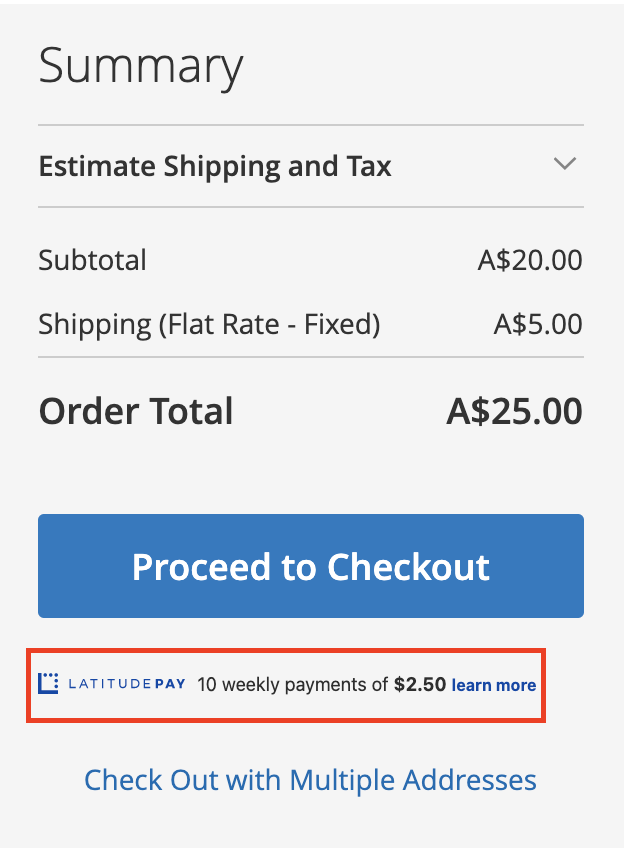
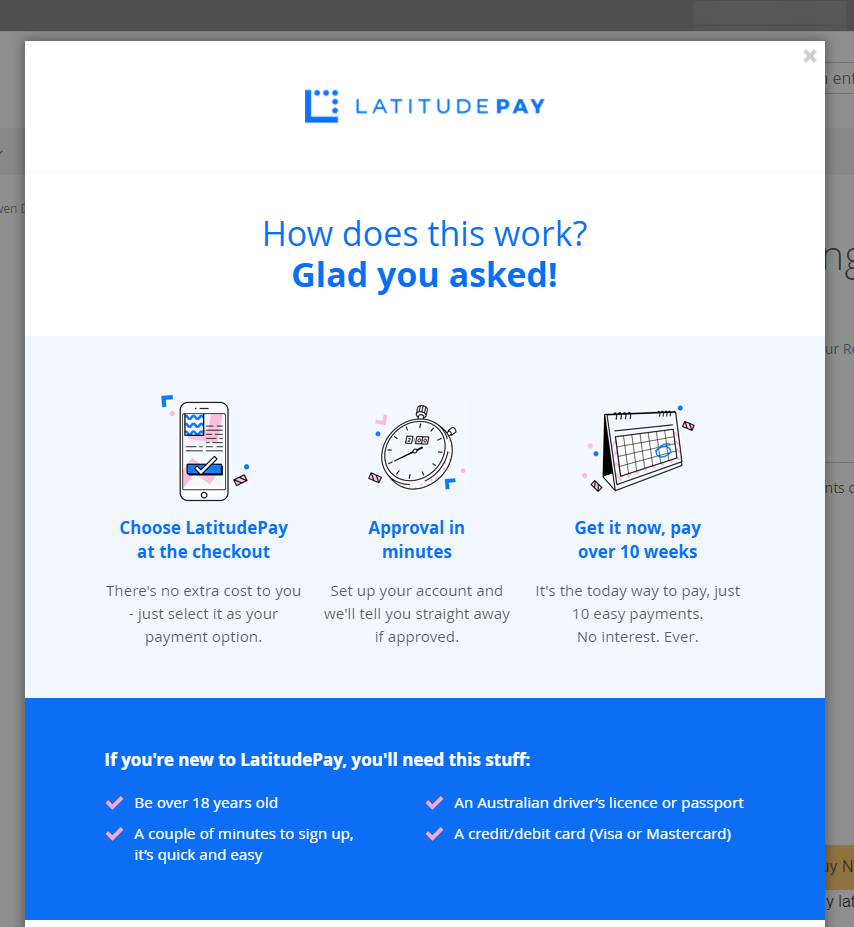
- Upon clicking the snippet, a pop-up modal should appear, containing detailed information regarding the payment plans offered on your site.
LatitudePay+ & Co-Presentment#
Approved merchants will have the option to offer their customers with either LatitudePay+ or our Co-Presentment Product offering in the admin panel. Co-Presentment will enable merchants to offer both LatitudePay for transactions below $1000 and LatitudePay+ will also be able to be offered on products above a minimum threshold.
To enable LatitudePay+ or Co-Presentment:
- Login inside the Admin Panel and proceed to Stores > Configuration > Sales > Payment Methods
- Select LatitudePay
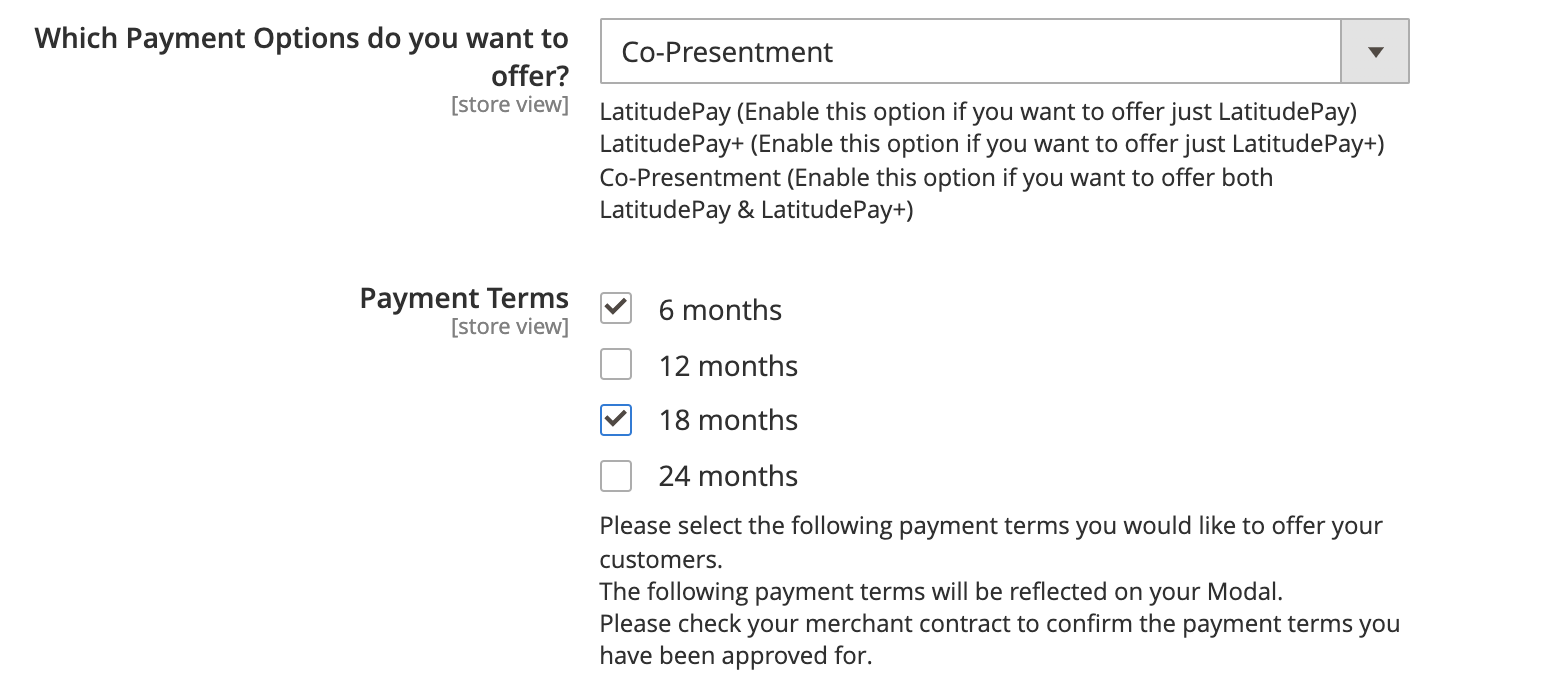
- You will be able to select which Payment Option you would like to offer your customers by selecting the drop down menu under “Which Payment Options do you want to offer?” option.

- Once the Payment option is selected, you will be able to Select the Payment Terms you want to offer for your customers. Please note. you can offer 4 different payment terms, 6,12,18 or 24 months. Please speak to your account manager and refer to your Merchant Contract to view which terms you have been approved to offer your customers. Please note at least one payment term will need to be selected but multiple options can be selected based on your contract.
- Please note that the payment terms selected will reflect on your PDP Modal and clearly will let visitors of your site know the number of months they are able to pay their transaction over. E.g If 12 & 24 months are selected in the Payment Terms section, the following information will be displayed if the Co-Presentment option is offered.
Main Functions#
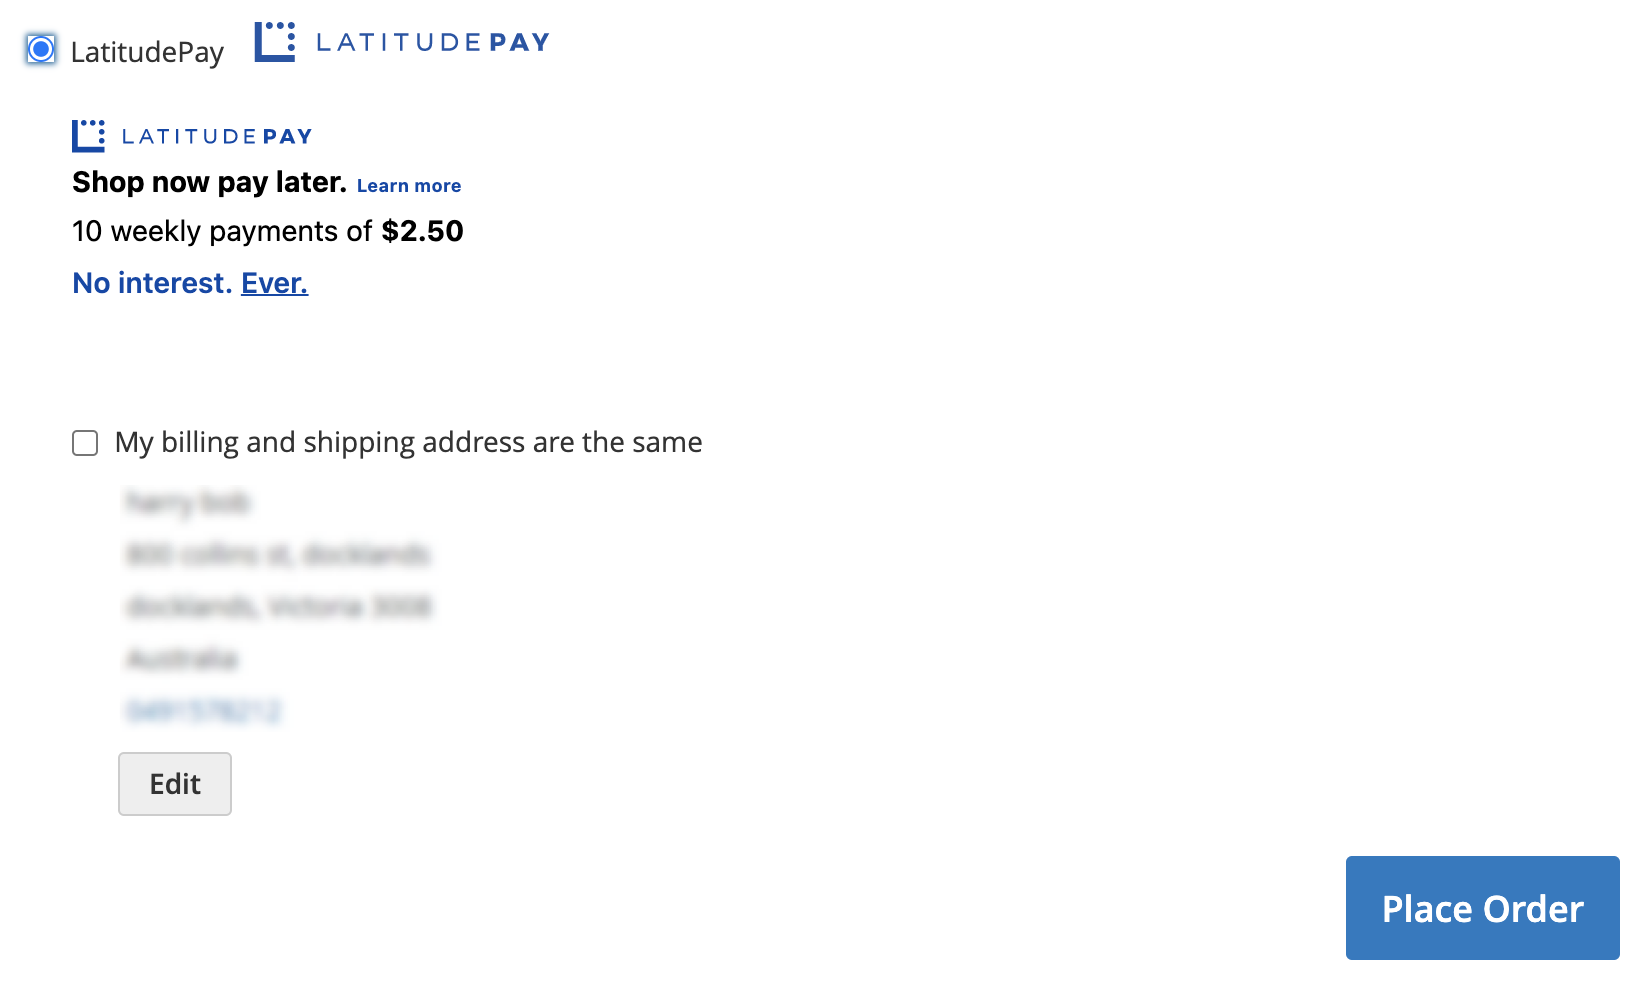
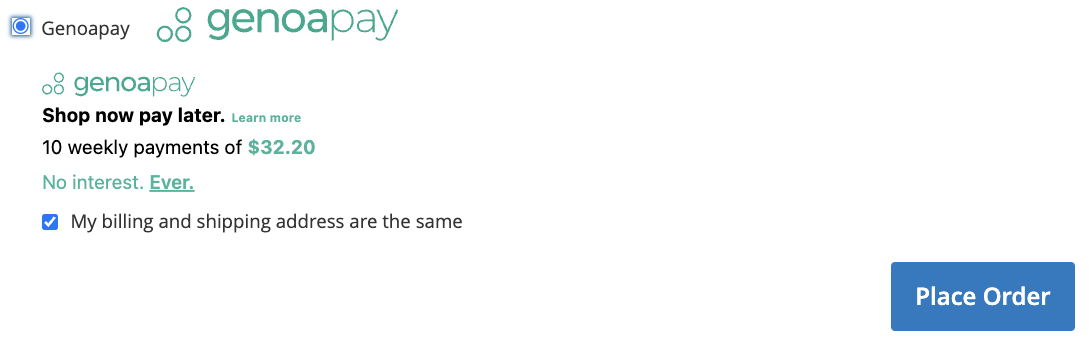
Easily Checkout Using LatitudePay/Genoapay payment methods
AU
NZ
Refunds#
Payments can be credited directly from the admin-panel of the shop. This means that the merchant does not have to log into our portals in order to edit payments but can handle them directly via the admin-panel.
Step 1:#
- In your Magento 2 backend, proceed to Sales > Orders.
- Select the order that you wish to refund.
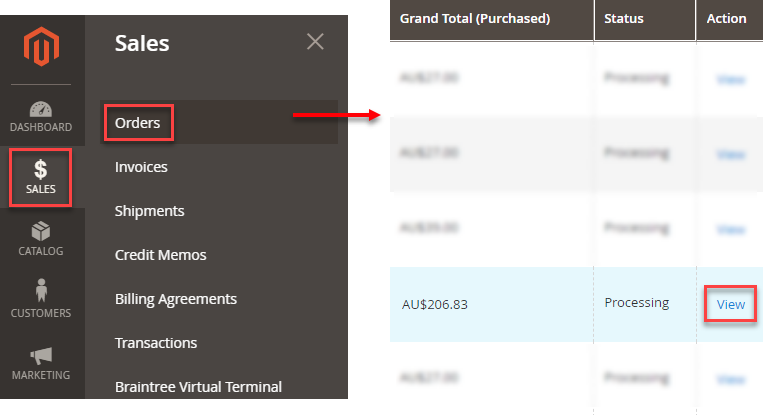
Step 2:#
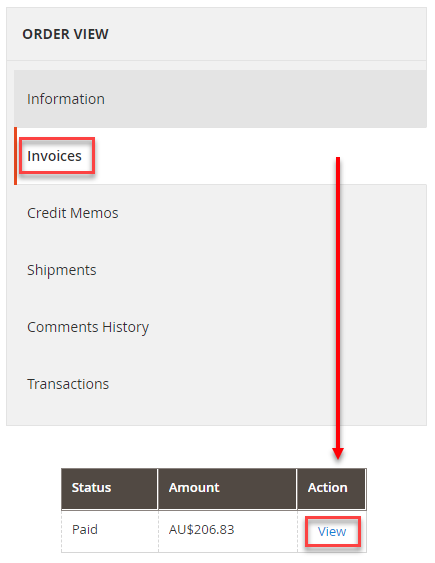
- Click View to see the transaction details
- Click Invoices to go to the Invoices Page and choose the Invoice that you would like to refund
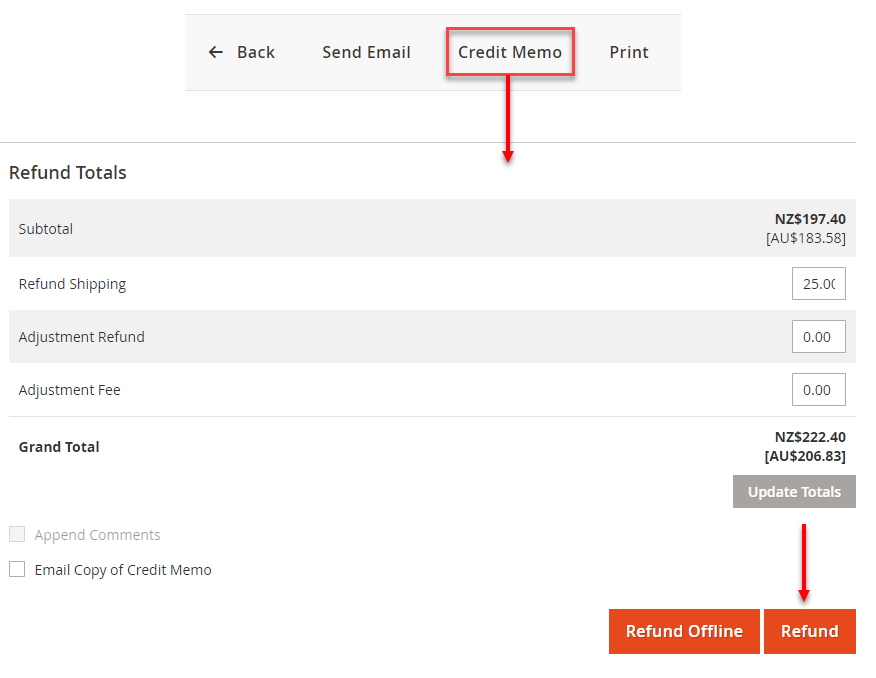
Step 3:#
- On the Invoice Details Page click Credit Memo

Step 4:#
- Select your refund options: refunding individual items, refunding shipping, refunding amount and refunding fee.
- Fill out the amount for the options you have selected
- Click Refund (not Refund Offline)
Remove/Uninstall LatitudePay#
Important Notice
If you are using both LatitudePay/Genoapay and Latitude Interest Free, then you will just need to disable LatitudePay/Genoapay and keep the plugin so you can continue to offer Interest Free as a payment checkout option.
Disable LatitudePay and Genoapay#
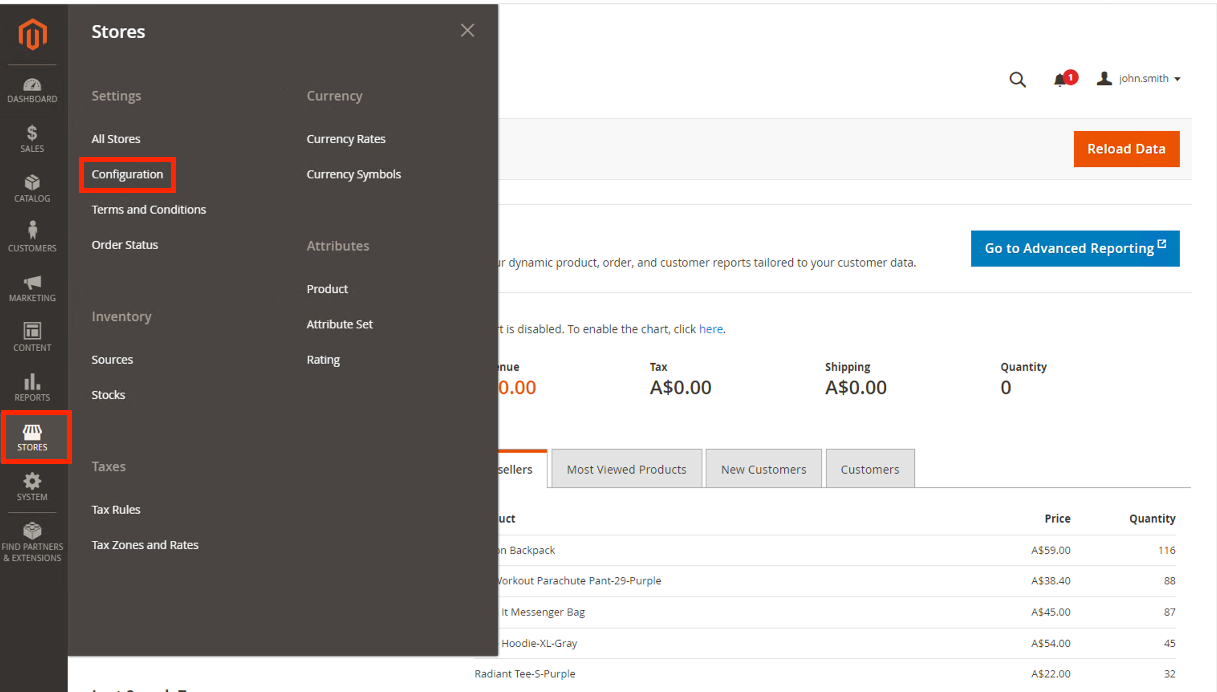
- Navigate to your Magento2 dashboard and select the Stores option from the left hand side column. From the extended menu that pops up please proceed with selecting the Configuration option that falls under the Settings section as shown below.
Once you load the Configuration page, scroll down till you see the Sales section and expand this. Here you will see the Payment Methods option, so please proceed with selecting this.
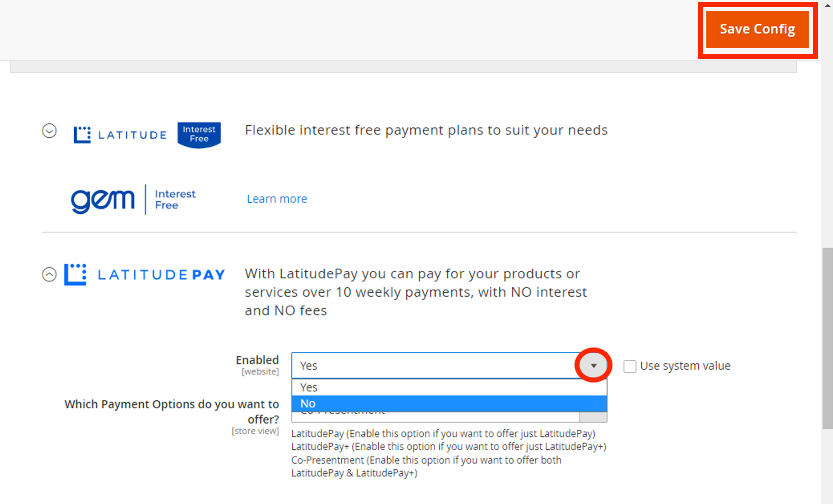
Once you have selected this, you will see a list of Payment Methods you are offering on your Magento site, and if you go to the section for Latitude Payment Service you will see it drop down and have the option for LatitudePay to be extended for configuration as shown below.
- When you have extended the LatitudePay configuration settings you will see a selection box for Enabled select this and choose the option No. This is all you need to change here and you can proceed with selecting the Save Config orange button in the top right.
Genoapay
Please repeat step 4 for Genoapay as well
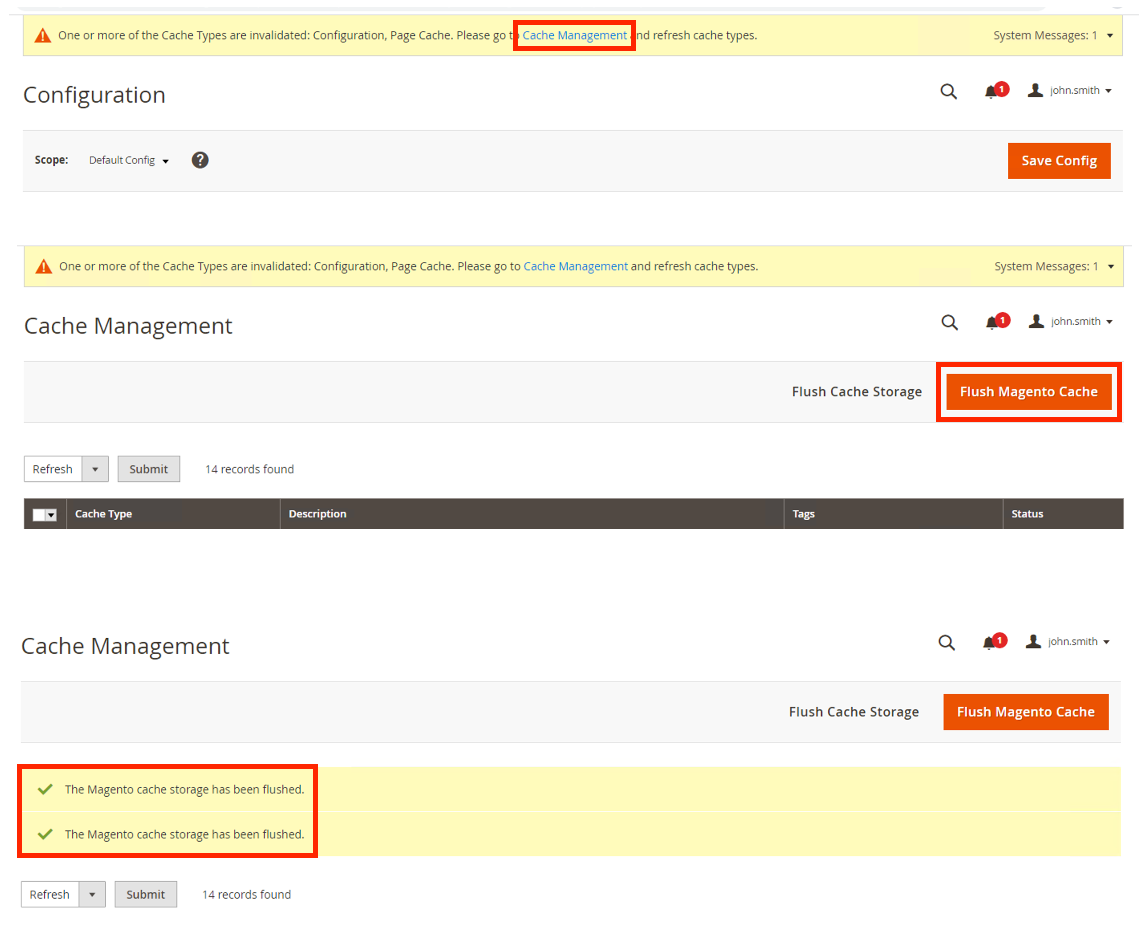
We highly recommend flushing your cache once you've done step 4. There should be a banner at the top of the screen to alert you of this. Please click the Cache Management hyperlink in that yellow banner.
When you get redirected, click the Flush Magento Cache orange button and wait for it to successfully flush. Once this has been done you will see that the banner that was at the top is no longer there and a successful confirmation banner will show that storage has been flushed, as you can see from the below image.
Removing Plugin#
Composer#
note
Use this guide in case you followed the composer installation guide when you first installed Latitude extension.
- Open terminal and navigate to Magento 2 root directory, for example:
- Run:
Manual#
note
Use this guide in case you followed the manual installation guide when you first installed Latitude extension.
- Open terminal and navigate to Magento 2 root directory, for example:
Remove Latitude folder in
<Magento2 root>/app/code/directory.Optional: Check the
core_config_datatable in your database for any variables related to the old LatitudePay/Genoapay plugin and REMOVE any keys that has this format:
- run the following from your Magento 2 root directory (
/var/www/html) for these actions to take effect:
You have now successfully disabled and removed the payment option for LatitudePay from your site.